Friday, March 31, 2023

[CLASS] Dungeon! - The Warlord

The Warlord

HP: +1d10 each Level, minimum of +5

AC: +1 each 2nd Level

AB: +1 each Level

Save: -1 each 2nd Level

Skills: +2 Skill Pips each Level


At 1st Level, your words have gained the power to bolster the spirit of your allies. As an Action, you may Heal a target that can see or hear you for (2d4 + your Warlord Level) HP. Once you have used this ability, you must finish a Long Rest before you may use it again.


At 2nd Level, you are able to bolster your allies more often. You may now use your 1st Level ability twice between Long Rests.


At 3rd Level, you begin to lead your allies in a specific style. Choose one of the options below.

  • War Chief: When you attempt Skill Checks to Demoralize or Taunt targets, you have Advantage.
  • Warlock: You gain the ability to Cast Spells. You learn 2 Spells and you gain 2 Spell Points (SP). Using 1 Spell Point, you may Cast any Spell you know. You regain used Spell Points after a Long Rest.
  • Warrior: You gain +2 AC and you deal +2 Damage with Weapons.


At 4th Level, you may now use your 1st Level ability three times between Long Rests.


At 5th Level, your leadership influences your combat. Once per Round and on your Turn, you may direct an ally, allowing them to attempt a single Weapon Attack.


At 6th Level, you may now use your 1st Level ability four times between Long Rests.


At 7th Level, your leadership style grows more potent. You gain the option below that matches the path you took at 3rd Level.

  • War Chief: When you succeed on Skill Checks to Demoralize or Taunt targets, you cause the Affliction Afraid 3 (Demoralize) or Provoked 3 (Taunt), and the target takes 1d6 Psychic Damage.
  • Warlock: You gain 2 additional Spell Points and learn 2 additional Spells.
  • Warrior: You gain an additional +2 AC and you deal an additional +2 Damage with Weapons.


At 8th Level, you may now use your 1st Level ability five times between Long Rests.


At 9th Level, you have mastered your leadership style. You gain the option below that matches the path you took at 3rd Level.

  • War Chief: Twice per Round and on your Turn, you may direct an ally, allowing them to attempt a single Weapon Attack.
  • Warlock: Twice per Round and on your Turn, you may direct an ally, allowing them to attempt a single Weapon Attack.
  • Warrior: Once per Round and on your Turn, you may attempt a single Weapon Attack as a Free Action.


At 10th Level, your leadership has shaped many battles, leaving an impact on both your friends and your foes. Your followers present you with a choice; you may either task them with building a Stronghold, or you may ask them to become a War Band. Details for both options are below.

  • Stronghold: You amass 1d20 + 30 1st Level Fighters who seek to serve you and fight alongside you, following your every command. They will build your Stronghold in a valid location over the course of 100 days. Once completed, you will rule over the Stronghold and any local settlements that seek your protection. Once up and running, your Stronghold will generate 1d6 Gold per day, with a bonus 1d6 to that rate for each settlement you protect. Finally, you and your allies may successfully rest within your Stronghold in half the normal time due to its accommodations.
  • War Band: You gather 1d10 + 20 2nd Level Barbarians who will travel with you and follow your every command. They will follow you into combat without question and will fight to the death.

Monday, March 27, 2023

[#DUNGEON23] Mountain of the Frost Baron - Mar 20 to Mar 26, 2023

A Little Late
Forgot to post last night. Below is the past week of progress. I hope to have Thon-Kyrr done soon as well!

Level 3, Rooms 20 through 25 (Floor 2)

  • Dungeon Level 3 Outline - Darkwater Crag
    • Entrances / Exits: Darkwater Crag Entrance [DWC] (less travelled, somewhat guarded, enters/exits directly into Craghopper Mine)
    • Location: Within Arguk-Val, adjacent to and below Craghopper Mine.
    • Threats: Centipedes (Giant), Centipedes (Giant, Dire), Flail Snails, Gelatinous Cubes, Goblins, Hobgoblins, Rats (Giant)

Darkwater Crag Encounter List
When a 1 is rolled on the Encounter Die, the GM rolls 1d20 on the table below. When it comes to the special encounters (15-20), the GM should reroll on the table if that encounter has already occurred.
  1. Legendary Gelatinous Cube; these creatures are not intelligent, solely seeking objects to digest.
  2. 2 Flail Snails; when encountered, these creatures are usually hungry and hostile.
  3. 2 Centipedes (Giant, Dire); when encountered, these creatures are usually hungry and hostile.
  4. "
  5. 1d4+1 Centipedes (Giant); when encountered, these creatures are usually hungry, but cautious.
  6. "
  7. 2d4 Rats (Giant); when encountered, these creatures are usually hungry, but cautious.
  8. "
  9. 2d4 Goblins; these goblins differ from the standard green type, having pale skin and milky-white eyes. They have many jagged teeth, baring them when threatened. They use simple weaponry and are hostile to other humanoid creatures.
  10. "
  11. "
  12. "
  13. Goblin Brigade (2d4 Goblins and 1d2 Hobgoblins); these goblins/hobgoblins differ from the standard type, having pale skin and milky-white eyes. They have many jagged teeth, baring them when threatened. They use simple weaponry and are hostile to other humanoid creatures.
  14. "
  15. L3R26
  16. L3R27
  17. L3R28
  18. L3R29
  19. L3R30
  20. L3R31
Monsters Stats
  • Centipede (Giant) - 2 CR
    • HP: 10
    • AC: 12
    • AB: +2
    • Damage: 1d6 + 2
    • Special: Can climb walls and upside down; Sickening (Causes the Affliction Enfeebled 1 on a hit)
    • Save: 14
    • Skills: +1
  • Centipede (Giant, Dire) - 5 CR
    • HP: 25
    • AC: 15
    • AB: +5
    • Damage: 1d6 + 5, attacks two times
    • Special: Can climb walls and upside down; Carapace (Takes 1 less Damage each time it takes Damage. It will always take at least 1 Damage.); Sickening (Causes the Affliction Enfeebled 2 on a hit)
    • Save: 13
    • Skills: +2
  • Flail Snail - 5 CR
    • HP: 25
    • AC: 17
    • AB: +5
    • Damage: 1d6 + 5, attacks two times
    • Special: Can climb walls and upside down; Blindsense (This creature can automatically sense targets within 30 feet of itself without needing to see them, and it is Immune to the Blind Affliction.); Brutal (Lands a Critical Hit on a Natural 19 or a Natural 20 and deals an additional 5 Damage on Critical Hits); Shell (This Monster has 2 additional AC. This is already accounted for in its Stats.)
    • Save: 13
    • Skills: +2
  • Gelatinous Cube (Legendary) - 6 CR
    • HP: 30
    • AC: 16
    • AB: +6
    • Damage: 1d6 + 6, attacks two times
    • Special: Immune to falling Prone, being Grappled, and being Shoved; Sticky (Once per combat, can automatically Grapple a target on a hit); Engulf (When this creature rolls maximum on Damage, the target is engulfed by this creature. While engulfed, a target cannot Move and attempts Attacks at Disadvantage. They also take 6 Acid Damage at the end of each Round. Finally, a target is only freed from being engulfed if this creature dies.); Legendary (This creature has 1 additional Turn each Round for every 2 party members. For example, it would have 2 additional Turns, or 3 total Turns, if fighting a party of 4.)
    • Save: 12
    • Skills: +3
  • Goblin - 1 CR
    • HP: 5
    • AC: 11
    • AB: +1
    • Damage: 1d6 + 1
    • Special: Can use Ranged Attacks; Scuttle (Can dodge a non-Critical Hit once per combat)
    • Save: 15
    • Skills: +0
  • Hobgoblin - 3 CR
    • HP: 15
    • AC: 13
    • AB: +3
    • Damage: 1d6 + 3
    • Special: Can use Ranged Attacks; Scuttle (Can dodge a non-Critical Hit once per combat)
    • Save: 14
    • Skills: +1
  • Rat (Giant) - 2 CR
    • HP: 10
    • AC: 12
    • AB: +2
    • Damage: 1d6 + 2
    • Special: Scuttle (Can dodge a non-Critical Hit once per combat)
    • Save: 14
    • Skills: +1

Level 3, Room 20 (L3R20)
This room contains the primary nest of Goblins and Hobgoblins that have claimed Darkwater Crag. This room is not meant to be balanced. Players are expected to find a strategic solution versus this large force. If they charge in foolishly, they should die foolishly.
  • Encounter: Goblin Nest [3d6+10 Goblins, 1d6+5 Hobgoblins]; Hostile (will Attack); Currently feeding.
    • Goblin - 1 CR
      • HP: 5
      • AC: 11
      • AB: +1
      • Damage: 1d6 + 1
      • Special: Can use Ranged Attacks; Scuttle (Can dodge a non-Critical Hit once per combat)
      • Save: 15
      • Skills: +0
    • Hobgoblin - 3 CR
      • HP: 15
      • AC: 13
      • AB: +3
      • Damage: 1d6 + 3
      • Special: Can use Ranged Attacks; Scuttle (Can dodge a non-Critical Hit once per combat)
      • Save: 14
      • Skills: +1
  • Special: If combat occurs in L3R17, 5 Goblins and 1 Hobgoblin will join the combat at the end of each Round, coming from this room.
  • Treasure: Goblin Treasure (if any), Takes 1 Dungeon Turn to sift through each pile of refuse [2 piles]. If sifted through, each pile contains; 3d6 Gold pieces and 3d6 Silver pieces.

Level 3, Room 21 (L3R21)
This room contains the treasure hoard of the occupying Goblins. Their Hobgoblin leader resides here with a pet Giant Centipede. The room also contains a small pool of dark, cold water.
  • Encounter: 1 Hobgoblin Leader and 1 Centipede (Giant, Dire); Hostile (will Attack); Sitting on his throne.
    • Hobgoblin Leader - 7 CR
      • HP: 35
      • AC: 17
      • AB: +7
      • Damage: 1d6 + 7, attacks two times
      • Special: Can use Ranged Attacks; Scuttle (Can dodge a non-Critical Hit once per combat); Intimidate (May cause one target to gain the Affliction Afraid 3 when combat begins).
      • Save: 12
      • Skills: +3
    • Centipede (Giant, Dire) - 5 CR
      • HP: 25
      • AC: 15
      • AB: +5
      • Damage: 1d6 + 5, attacks two times
      • Special: Can climb walls and upside down; Carapace (Takes 1 less Damage each time it takes Damage. It will always take at least 1 Damage.); Sickening (Causes the Affliction Enfeebled 2 on a hit)
      • Save: 13
      • Skills: +2
  • Special: If the Goblins/Hobgoblins within L3R20 are all sent out as reinforcements, the Hobgoblin Leader and his Centipede will follow them out as a last resort.
  • Treasure: 72 Gold pieces, 507 Silver pieces, 1,730 Copper pieces, 27 assorted Relics (Gems, Jewelry, etc.) each worth 10 Gold pieces, +1 Silvered Longsword, +1 Light Armor, +1 Foci (See the Magic Item List).

Level 3, Room 22 (L3R22)
This room is under goblin control, with a barricade of sharpened bones blocking the eastern entrance. The room also contains a small pool of dark, cold water.
  • Encounter: Goblin Brigade [2d4 Goblins, 1d2 Hobgoblins]; Hostile (will Attack); Currently on duty, guarding the area.
    • Goblin - 1 CR
      • HP: 5
      • AC: 11
      • AB: +1
      • Damage: 1d6 + 1
      • Special: Can use Ranged Attacks; Scuttle (Can dodge a non-Critical Hit once per combat)
      • Save: 15
      • Skills: +0
    • Hobgoblin - 3 CR
      • HP: 15
      • AC: 13
      • AB: +3
      • Damage: 1d6 + 3
      • Special: Can use Ranged Attacks; Scuttle (Can dodge a non-Critical Hit once per combat)
      • Save: 14
      • Skills: +1
  • Special: If combat occurs in L3R20, this Brigade will join the combat at the end of the 2nd Round.
  • Treasure: Goblin Treasure (if any), Weapon Rack (holds 1 poor Spear, 1 poor Glaive, and 1 poor Longsword).

Level 3, Room 23 (L3R23)
This room is littered with the charred, long-dead skeletal remains of dozens of Goblins. To the north-east, there is a short hallway leading to a caged pedestal. The hallway is clearly a trap, with pressure plates on the floor and burn marks marking both walls. The walls are decorated with stone-carved mockeries of Dwarven faces, each puffing their cheeks as if blowing air.
  • Special
    • Ancient Dwarven Trap: GMs; See the right-most image below. The hallway of pressure plates is 10 feet wide, 12.5 feet long, and 10 feet tall. The matrix of letters corresponds to the pressure plates themselves, with each pressure plate displaying a worn depiction of a Dwarvish letter. The English equivalents are listed in the matrix, but the characters will only recognize them as Dwarvish runes unless they know the Dwarvish language (i.e., such as Dwarves or those who have lived in Argukhart). Each pressure plate is a 2.5-foot by 2.5-foot square.
      • Disarming the Trap: Disarming the trap is certainly possible (DC 20 per pressure plate), but the trap is a puzzle, first and foremost. If the puzzle goes unsolved, the cage will not move, leaving the chalice out of reach.
      • Puzzle: To solve the puzzle, a Character must step on the correct pressure plates in the correct order. The correct order is determined by the current "password." The password always starts as "cease." If the password is attempted but failed, the password cycles to "drink," then to "peril," then to "water," and then back to "cease." Characters will likely have to attempt some kind of trial and error at first, so allow them to creatively push the plates without simply tanking the Damage (such as using a 10-foot pole or heavy rocks, etc.). Finally, only 1 pressure plate may be pushed down at a time. If more than one is pushed down, the trap goes off and resets, changing the password. If the password is input correctly, the pressure plates deactivate and the cage rends apart, allowing easy access to the pedestal and the chalice atop it.
      • Effect: If triggered, each target within the pressure-plate hallway must roll a Save. If they fail, they take 10d6 Fire Damage, as each stone-face spews out liquid flames. If they succeed, they take half as much Damage.
  • Treasure: A golden chalice decorated with priceless gems (see Special). If obtained, the chalice serves as a unique Magic Item.
    • The Chalice: If obtained, this item exudes a powerful magical aura noticeable by any spellcaster. The chalice has a single magical effect/purpose; if filled with any kind of liquid, it will turn that liquid into a bubbling, black ichor. The ichor does not look appealing, nor does it taste good. However, drinking a full chalice of the ichor will Heal a target to full HP. Finally, a target Healed by the chalice must roll a Save. If they fail, their Maximum HP is permanently reduced by 5.
    • Special: The chalice is trapped within a wrought iron cage, which surrounds the pedestal it sits upon (See 1). Possibly through magic, the cage is seemingly immovable and indestructible. The chalice cannot be removed from the cage, even if one's hands are small enough to reach through. There is a mechanism attached to the base of the cage, however, that seems to connect to the hallway of pressure plates.


Level 3, Room 24 (L3R24)
This room is empty aside from a small pool of dark, cold water.
  • Encounter: None.
  • Treasure: None.

Level 3, Room 25 (L3R25)
This room is only accessible via the underwater passage between L3R24 and L3R16. The room appears to be a second grotto of treasure gathered by the Goblins.
  • Treasure: 15 Gold pieces, 109 Silver pieces, 352 Copper pieces, 5 assorted gems (each worth 9 Gold), +1 Mace, +1 Shield.

Level 3, Room 26 (L2R26)
This "room" is instead a Special Encounter that may be found within Darkwater Crag. Below is the Darkwater Crag Encounter List to serve as reference.

Darkwater Crag Encounter List
When a 1 is rolled on the Encounter Die, the GM rolls 1d20 on the table below. When it comes to the special encounters (15-20), the GM should reroll on the table if that encounter has already occurred.
  1. Legendary Gelatinous Cube; these creatures are not intelligent, solely seeking objects to digest.
  2. 2 Flail Snails; when encountered, these creatures are usually hungry and hostile.
  3. 2 Centipedes (Giant, Dire); when encountered, these creatures are usually hungry and hostile.
  4. "
  5. 1d4+1 Centipedes (Giant); when encountered, these creatures are usually hungry, but cautious.
  6. "
  7. 2d4 Rats (Giant); when encountered, these creatures are usually hungry, but cautious.
  8. "
  9. 2d4 Goblins; these goblins differ from the standard green type, having pale skin and milky-white eyes. They have many jagged teeth, baring them when threatened. They use simple weaponry and are hostile to other humanoid creatures.
  10. "
  11. "
  12. "
  13. Goblin Brigade (2d4 Goblins and 1d2 Hobgoblins); these goblins/hobgoblins differ from the standard type, having pale skin and milky-white eyes. They have many jagged teeth, baring them when threatened. They use simple weaponry and are hostile to other humanoid creatures.
  14. "
  15. L3R26
  16. L3R27
  17. L3R28
  18. L3R29
  19. L3R30
  20. L3R31
L3R26
  • Encounter: A Giant Rat is found dead. It seems fresh but shows no evidence of Damage or combat.
  • TreasureIf searched or examined closely; within the Rat's throat is a Gold piece. It must have choked.

Sunday, March 19, 2023

[#DUNGEON23] Mountain of the Frost Baron - Mar 6 to Mar 12, 2023 *and* Mar 13 to Mar 19, 2023

Getting Back in the Groove
Having COVID threw me off my groove a bit, so I missed last week's post (whoops). I did not get behind, but I realized as I went to make this post that I had forgotten last weeks. Anyway, both weeks are posted below!

Level 3, Rooms 6 through 15 (Floor 1)

  • Dungeon Level 3 Outline - Darkwater Crag
    • Entrances / Exits: Darkwater Crag Entrance [DWC] (less travelled, somewhat guarded, enters/exits directly into Craghopper Mine)
    • Location: Within Arguk-Val, adjacent to and below Craghopper Mine.
    • Threats: Centipedes (Giant), Centipedes (Giant, Dire), Flail Snails, Gelatinous Cubes, Goblins, Hobgoblins, Rats (Giant)

Darkwater Crag Encounter List
When a 1 is rolled on the Encounter Die, the GM rolls 1d20 on the table below. When it comes to the special encounters (15-20), the GM should reroll on the table if that encounter has already occurred.
  1. Legendary Gelatinous Cube; these creatures are not intelligent, solely seeking objects to digest.
  2. 2 Flail Snails; when encountered, these creatures are usually hungry and hostile.
  3. 2 Centipedes (Giant, Dire); when encountered, these creatures are usually hungry and hostile.
  4. "
  5. 1d4+1 Centipedes (Giant); when encountered, these creatures are usually hungry, but cautious.
  6. "
  7. 2d4 Rats (Giant); when encountered, these creatures are usually hungry, but cautious.
  8. "
  9. 2d4 Goblins; these goblins differ from the standard green type, having pale skin and milky-white eyes. They have many jagged teeth, baring them when threatened. They use simple weaponry and are hostile to other humanoid creatures.
  10. "
  11. "
  12. "
  13. Goblin Brigade (2d4 Goblins and 1d2 Hobgoblins); these goblins/hobgoblins differ from the standard type, having pale skin and milky-white eyes. They have many jagged teeth, baring them when threatened. They use simple weaponry and are hostile to other humanoid creatures.
  14. "
  15. L3R26
  16. L3R27
  17. L3R28
  18. L3R29
  19. L3R30
  20. L3R31
Monsters Stats
  • Centipede (Giant) - 2 CR
    • HP: 10
    • AC: 12
    • AB: +2
    • Damage: 1d6 + 2
    • Special: Can climb walls and upside down; Sickening (Causes the Affliction Enfeebled 1 on a hit)
    • Save: 14
    • Skills: +1
  • Centipede (Giant, Dire) - 5 CR
    • HP: 25
    • AC: 15
    • AB: +5
    • Damage: 1d6 + 5, attacks two times
    • Special: Can climb walls and upside down; Carapace (Takes 1 less Damage each time it takes Damage. It will always take at least 1 Damage.); Sickening (Causes the Affliction Enfeebled 2 on a hit)
    • Save: 13
    • Skills: +2
  • Flail Snail - 5 CR
    • HP: 25
    • AC: 17
    • AB: +5
    • Damage: 1d6 + 5, attacks two times
    • Special: Can climb walls and upside down; Blindsense (This creature can automatically sense targets within 30 feet of itself without needing to see them, and it is Immune to the Blind Affliction.); Brutal (Lands a Critical Hit on a Natural 19 or a Natural 20 and deals an additional 5 Damage on Critical Hits); Shell (This Monster has 2 additional AC. This is already accounted for in its Stats.)
    • Save: 13
    • Skills: +2
  • Gelatinous Cube (Legendary) - 6 CR
    • HP: 30
    • AC: 16
    • AB: +6
    • Damage: 1d6 + 6, attacks two times
    • Special: Immune to falling Prone, being Grappled, and being Shoved; Sticky (Once per combat, can automatically Grapple a target on a hit); Engulf (When this creature rolls maximum on Damage, the target is engulfed by this creature. While engulfed, a target cannot Move and attempts Attacks at Disadvantage. They also take 6 Acid Damage at the end of each Round. Finally, a target is only freed from being engulfed if this creature dies.); Legendary (This creature has 1 additional Turn each Round for every 2 party members. For example, it would have 2 additional Turns, or 3 total Turns, if fighting a party of 4.)
    • Save: 12
    • Skills: +3
  • Goblin - 1 CR
    • HP: 5
    • AC: 11
    • AB: +1
    • Damage: 1d6 + 1
    • Special: Can use Ranged Attacks; Scuttle (Can dodge a non-Critical Hit once per combat)
    • Save: 15
    • Skills: +0
  • Hobgoblin - 3 CR
    • HP: 15
    • AC: 13
    • AB: +3
    • Damage: 1d6 + 3
    • Special: Can use Ranged Attacks; Scuttle (Can dodge a non-Critical Hit once per combat)
    • Save: 14
    • Skills: +1
  • Rat (Giant) - 2 CR
    • HP: 10
    • AC: 12
    • AB: +2
    • Damage: 1d6 + 2
    • Special: Scuttle (Can dodge a non-Critical Hit once per combat)
    • Save: 14
    • Skills: +1

Level 3, Room 6 (L3R6)
This room contains the remains of a long-dead adventuring party that seemingly got lost down here.
  • Special: Bones and Items are clearly strewn about the room.
  • Treasure: 1 Longsword (+1), 1 Greataxe (+1), 1 Longbow, 15 Arrows, 1 Shield, 3d6 Silver pieces.

Level 3, Room 7 (L3R7)
This room contains a stinking pile of decaying refuse, which seems to have attracted some Dire Giant Centipedes.
  • Encounter: 2 Centipedes (Giant, Dire); Preoccupied (can be avoided, but will Attack if provoked); Currently feeding upon decaying refuse.
    • Centipede (Giant, Dire) - 5 CR
      • HP: 25
      • AC: 15
      • AB: +5
      • Damage: 1d6 + 5, attacks two times
      • Special: Can climb walls and upside down; Carapace (Takes 1 less Damage each time it takes Damage. It will always take at least 1 Damage.); Sickening (Causes the Affliction Enfeebled 2 on a hit)
      • Save: 13
      • Skills: +2
  • Treasure: Takes 1 Dungeon Turn to sift through the pile of refuse. If sifted through; 1d4 Gold pieces, 2d4 Silver pieces, and 3 rusted Weapons (useless).

Level 3, Room 8 (L3R8)
This room is a mostly empty hallway of sorts, containing a small pool of dark, cold water.
  • Encounter: None.
  • Treasure: None.

Level 3, Room 9 (L3R9)
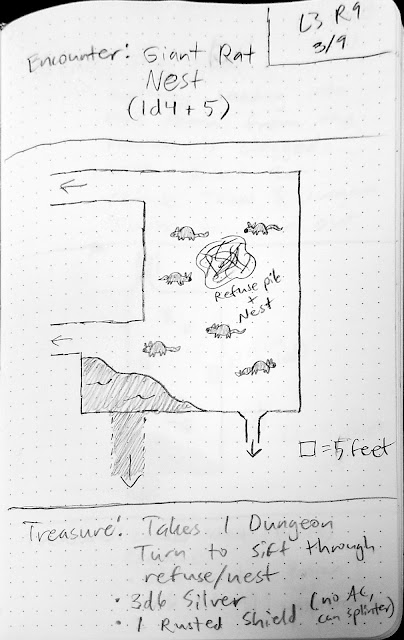
This room contains a Giant Rat nest, made primarily of refuse. It also contains a pool of dark, cold water.
  • Encounter: 1d4+5 Rats (Giant); Territorial (will Attack to defend their nest); Currently building the nest.
    • Rat (Giant) - 2 CR
      • HP: 10
      • AC: 12
      • AB: +2
      • Damage: 1d6 + 2
      • Special: Scuttle (Can dodge a non-Critical Hit once per combat)
      • Save: 14
      • Skills: +1
  • Treasure: Takes 1 Dungeon Turn to sift through the nest. If sifted through; 3d6 Silver pieces and 1 rusted Shield (provides no bonus to AC but can be Splintered once).

Level 3, Room 10 (L3R10)
This room contains a Giant Rat nest, made primarily of refuse. It also contains a pool of dark, cold water.
  • Special: The hallway leading into this room from the north (L3R9) is clogged with refuse from the Giant Rats. It takes 3 Dungeon Turns to clear out the hallway.
  • Treasure: Locked Chest (DC 15); Contains 5d6 Gold pieces, 3d6 Silver pieces, and 1 Potion of Waterbreathing (Allows the user to breathe underwater for 1 hour when quaffed).

Level 3, Room 11 (L3R11)
This room appears to have once suffered a cave-in. Mossy rocks are scattered about the room.
  • Special: All exits from this room (aside from the underwater passage) are blocked by rubble. Each tunnel may be cleared by using 3 Dungeon Turns to remove the blockages.
  • Treasure: None.

Level 3, Room 12 (L3R12)
The hallway leading into this room contains stairs going down to the 2nd floor of Darkwater Crag. The room itself contains a large pool of dark, cold water.
  • Encounter: 1d2 Flail Snails; Hostile (will Attack); Currently feeding on moss growing in the area.
    • Flail Snail - 5 CR
      • HP: 25
      • AC: 17
      • AB: +5
      • Damage: 1d6 + 5, attacks two times
      • Special: Can climb walls and upside down; Blindsense (This creature can automatically sense targets within 30 feet of itself without needing to see them, and it is Immune to the Blind Affliction.); Brutal (Lands a Critical Hit on a Natural 19 or a Natural 20 and deals an additional 5 Damage on Critical Hits); Shell (This Monster has 2 additional AC. This is already accounted for in its Stats.)
      • Save: 13
      • Skills: +2
  • Special: Stairs down to Floor 2.
  • Treasure: None.

Level 3, Room 13 (L3R13)
This room contains two shallow pools of dark, cold water.
  • Special: If the party has a light source, shiny objects within the pools twinkle in the light.
  • Treasure: Pool 1 contains; 3d6 Silver pieces and 1d6 Gold pieces. Pool 2 contains; 2d6 Gold pieces and 4d6 Copper pieces.

Level 3, Room 14 (L3R14)
This room is a small dead end with a pool of dark, cold water.
  • Encounter: 1d4+1 Rats (Giant); Nervous (will flee if approached, only Attacking as a last resort); Currently searching for food.
    • Rat (Giant) - 2 CR
      • HP: 10
      • AC: 12
      • AB: +2
      • Damage: 1d6 + 2
      • Special: Scuttle (Can dodge a non-Critical Hit once per combat)
      • Save: 14
      • Skills: +1
  • Treasure: None.

Level 3, Room 15 (L3R15)
This room is fairly small, but noticeably wet, with both water and some kind of viscous gel. It also contains a small pool of dark, cold water as well as stairs down to Floor 2 of Darkwater Crag.
  • Encounter: 1 Gelatinous Cube (Legendary); Hostile (will Attack); Currently sitting motionless in front of the stairs down. There is a 3-in-6 chance that the party does not notice the Gelatinous Cube, staring right through its clear body. If unnoticed, the Gelatinous Cube automatically has Surprise when it Attacks.
    • Gelatinous Cube (Legendary) - 6 CR
      • HP: 30
      • AC: 16
      • AB: +6
      • Damage: 1d6 + 6, attacks two times
      • Special: Immune to falling Prone, being Grappled, and being Shoved; Sticky (Once per combat, can automatically Grapple a target on a hit); Engulf (When this creature rolls maximum on Damage, the target is engulfed by this creature. While engulfed, a target cannot Move and attempts Attacks at Disadvantage. They also take 6 Acid Damage at the end of each Round. Finally, a target is only freed from being engulfed if this creature dies.); Legendary (This creature has 1 additional Turn each Round for every 2 party members. For example, it would have 2 additional Turns, or 3 total Turns, if fighting a party of 4.)
      • Save: 12
      • Skills: +3
  • Special: Stairs down to Floor 2.
  • Treasure: If killed, the Gelatinous Cube spews out the following; 3d6 Silver pieces, 5d6 Gold pieces, a seemingly normal skull containing rubies for eyes (this Item is actually an Occult Object, per the Magic Item List).

Level 3, Rooms 16 through 19 (Floor 2)

Level 3, Room 16 (L3R16)
This room is somewhat large, containing a large pool of dark, cold water. There is a short hallway leading to stairs to the 1st floor of Darkwater Crag.
  • Special (Dangerous): If the party has a light source, each Dungeon Turn spent in this room has a 3-in-6 chance to alert the Goblins in L3R17.
  • Special: Stairs up to Floor 1.
  • Treasure: None.

Level 3, Room 17 (L3R17)
This room is under goblin control, with a barricade of sharpened bones blocking the eastern entrance from L3R16. The room also contains a small pool of dark, cold water, as well as 2 piles of goblin refuse.
  • Encounter: Goblin Brigade [2d4 Goblins, 1d2 Hobgoblins]; Hostile (will Attack); Currently on duty, guarding the area.
    • Goblin - 1 CR
      • HP: 5
      • AC: 11
      • AB: +1
      • Damage: 1d6 + 1
      • Special: Can use Ranged Attacks; Scuttle (Can dodge a non-Critical Hit once per combat)
      • Save: 15
      • Skills: +0
    • Hobgoblin - 3 CR
      • HP: 15
      • AC: 13
      • AB: +3
      • Damage: 1d6 + 3
      • Special: Can use Ranged Attacks; Scuttle (Can dodge a non-Critical Hit once per combat)
      • Save: 14
      • Skills: +1
  • Special: See L3R16.
  • Treasure: Goblin Treasure (if any), Takes 1 Dungeon Turn to sift through each pile of refuse. If sifted through, each pile contains; 3d6 Gold pieces and 3d6 Silver pieces.

Level 3, Room 18 (L3R18)
This room appears to be a barracks of sorts for the goblins in L3R17. It also contains a small pool of dark, cold water.
  • Encounter: None.
  • Treasure: Weapon Rack; contains 3 poor Spears and 2 poor Shortswords. Takes 1 Dungeon Turn to sift through the pile of refuse. If sifted through, the pile contains; 2d6 Gold pieces and 3d6 Silver pieces.

Level 3, Room 19 (L3R19)
This room appears to be a Giant Centipede breeding room, where the goblins have trapped the Centipedes with sharpened bone barricades and have been dumping decaying matter as food. The goblins must be using the Centipedes as a source of meat.
  • Encounter: 1d4+1 Centipedes (Giant); Passive (will only Attack if provoked); Currently feeding or resting.
    • Centipede (Giant) - 2 CR
      • HP: 10
      • AC: 12
      • AB: +2
      • Damage: 1d6 + 2
      • Special: Can climb walls and upside down; Sickening (Causes the Affliction Enfeebled 1 on a hit)
      • Save: 14
      • Skills: +1
  • Treasure: None.

Tuesday, March 7, 2023

[#DUNGEON23] Mountain of the Frost Baron - Feb 20 to Feb 26, 2023 *and* Feb 27 to Mar 5, 2023

COVID Sucks
Two weeks ago I got COVID after managing to avoid it for 3 years... Unfortunately, it completely took me out of commission for about a week and a half, so I've been playing catchup on Dungeon23. However, I'm glad to say I have caught up! Argukhart was just posted here... better late than never. The end of Steepwalker Trail and the start of Darkwater Crag can be found within this super-post. Finally, my next step is Thon-Kyrr. Hopefully it doesn't take as long as Argukhart -_-

Anyway, here's my backlog of progress!

Level 2, Rooms 20 through 28

  • Dungeon Level 2 Outline - Steepwalker Trail
    • Entrances / Exits: Lostone Entrance [STL] (heavily travelled, guarded, 15 minutes by foot to Lostone), Thon-Kyrr Entrance [STT] (heavily travelled, guarded, enters directly into Thon-Kyrr), Crevasse Entrance [CMC] (heavily travelled, connects Steepwalker Trail to Craghopper Mine)
    • Location: On Arguk-Val, climbing up the south-western side.
    • Threats: Bears, Cougars, Hawks (Giant), Spiders (Giant), Trolls

Level 2, Rooms 13 through 19 (L2R13 through L2R19)
These "rooms" are instead Special Encounters that may be found within Steepwalker Trail. Below are both the Steepwalker Trail Encounter List and the Steepwalker Trail Special Encounter List to serve as references.

Steepwalker Trail Encounter List
When a 1 is rolled on the Encounter Die, the GM rolls 1d20 on the table below. On a 11-20, consult the Steepwalker Trail Special Encounter Table below this one.
  1. 1 Troll; when encountered, these creatures are usually hungry and very hostile.
  2. 1 Bear; when encountered, these creatures are usually hungry. However, they tend to avoid combat when possible.
  3. 1 Cougar; when encountered, these creatures are usually hungry. However, they tend to avoid combat when possible.
  4. "
  5. 1d4 Spiders (Giant); when encountered, these creatures are usually hungry, but cautious.
  6. 1d2 Spiders (Giant); when encountered, these creatures are usually hungry, but cautious.
  7. "
  8. 1d4+1 Hawks (Giant); when encountered, these creatures are usually hunting other animals as prey. However, they may harass creatures that they see as competition for their food.
  9. "
  10. "
  11. See Special Encounter List.
  12. See Special Encounter List.
  13. See Special Encounter List.
  14. See Special Encounter List.
  15. See Special Encounter List.
  16. See Special Encounter List.
  17. See Special Encounter List.
  18. See Special Encounter List.
  19. See Special Encounter List.
  20. See Special Encounter List.
Steepwalker Trail Special Encounter List
When it comes to the special encounters below, the GM should reroll on the table if that encounter has already occurred.
  1. L2R9
  2. L2R10
  3. L2R11
  4. L2R12
  5. L2R13
  6. L2R14
  7. L2R15
  8. L2R16
  9. L2R17
  10. L2R18
  11. L2R19
  12. L2R20
  13. L2R21
  14. L2R22
  15. L2R23
  16. L2R24
  17. L2R25
  18. L2R26
  19. L2R27
  20. L2R28
  • Side Note: If you happen to have a d30 lying around, you can easily just roll that to determine encounters for Steepwalker Trail by just adding 10 to all of the values of the Special Encounter List (i.e., 1 becomes 11, 2 becomes 12, 20 becomes 30, etc.). It will make the Special Encounters more common, but that's part of the fun of this Dungeon Level.
L2R20
  • Encounter: 1 Legendary Gargoyle; Hostile (will Attack); Currently gathering gems and jewels from a dead Dwarf.
    • Gargoyle - 4 CR
      • HP: 20
      • AC: 14
      • AB: +4
      • Damage: 1d6 + 4
      • Special: Stoneskin (This creature takes 2 less Damage each time it takes Damage. It always takes at least 1 Damage.); Legendary (This creature has 1 additional Turn each Round for every 2 party members. For example, it would have 2 additional Turns, or 3 total Turns, if fighting a party of 4.)
      • Save: 13
      • Skills: +2
  • Treasure: Sack of gems/coins; 1 Citrine worth 100 Gold, 1 Topaz worth 50 Gold, 10d6 Gold pieces.
L2R21
  • Encounter: A corrupted tree overhangs the trail, with a decaying Human body strung up from a thick branch.
    • 1d4+1 Corrupted Druids; Hostile (will Attack); Currently performing a ritual around the corrupted tree. They have no weapons or armor, instead having leathery skin and sharp claws/teeth.
    • Corrupted Druid - 2 CR
      • HP: 10
      • AC: 12
      • AB: +2
      • Damage: 1d6 + 2
      • Special: 1 Spell Point; Sting (The user may choose a target within Medium Range and attempt an Attack Roll. On a hit, the target takes 2d4 + 2 Poison Damage and must roll a Save. If they fail, they gain the Affliction Poisoned 2.)
      • Save: 14
      • Skills: +1
  • Treasure: The druids carry no treasure, but the tree's trunk is stuffed with coins; 3d6 Gold pieces, 5d6 Silver pieces.

L2R22
  • Encounter: An obsidian obelisk stands 12-feet tall in the middle of the road. 4 feet from the ground on one side there is a right-handed handprint impressed into the obelisk.
  • Special: Placing a hand into the handprint causes 2d6 Necrotic Damage and causes the hand used to bleed black blood. The black blood forever stains the hand used. Finally, 1 Gold coin appears in the stained hand.
    • Note: May only be used right-handed and may only be used by each person once.
  • Treasure: Up to 1 Gold per person who offers their hand.

L2R23
  • Encounter: Along the side of the mountain, vines grow in a large area, blossoming with light red flowers. The vines are thorny to the touch. While beautiful, the flowers have no inherent value.
  • Treasure: None.
L2R24
  • Encounter: Gerda Stonefoot (Dwarven Torchbearer); Wounded, woozy, and desperate; Recently robbed by bandits and slowly bleeding out; Gerda will die if not healed for at least 1 HP within 1 hour.
    • Gerda Stonefoot (Torchbearer) - 0 CR
      • HP: 10 (currently at 1 HP)
      • AC: 15
      • AB: +0
      • Damage: N/A, cannot Attack
      • Special: Torchbearers craft 1d4 Torches after a Long Rest. Also, Torchbearers will avoid fleeing from combat unless ordered otherwise. However, the most a Torchbearer will do in combat is provide the actual fighters with light.
      • Save: 15
      • Skills: +1
  • Special: Gerda may be hired by the party as a Hireling, per the Hireling Rules. Gerda is considered to be a Torchbearer, meaning her daily pay would normally be 3 Silver. However, she will offer her services at a discounted rate if her life is saved, only requiring 1 Silver per day.
  • Treasure: None.

L2R25
  • Encounter: 2d4+5 Elf Warriors; Indifferent; Currently hunting monsters in the area in an effort to keep Thon-Kyrr safe.
    • Elf - 2 CR
      • HP: 10
      • AC: 12
      • AB: +2
      • Damage: 1d6 + 2
      • Special: Can use Ranged Attacks; 1 Spell Point; Magic Missile (The user creates 2 magical darts. They may then instantly send each dart to any target within Medium Range. These darts hit automatically and each dart deals 1d4 Force Damage.)
      • Save: 14
      • Skills: +1
  • Treasure: Misc. weapons/armor, 2d4+10 Rations, 2d6+10 Gold pieces.
    • Note: Obviously, this Treasure can only be taken if stolen from the Elves or taken by force.
L2R26
  • Encounter: 1d4+1 Hawks (Giant); Territorial (will attack if provoked); Circling above like buzzards.
    • Hawk (Giant) - 2 CR
      • HP: 10
      • AC: 12
      • AB: +2
      • Damage: 1d6 + 2
      • Special: Can fly
      • Save: 14
      • Skills: +1
  • Treasure: If the Hawks are killed; Rations (Hawk meat) equal to twice the number of killed Giant Hawks.
L2R27
  • Encounter: Along the side of the trail, a decaying tree stump is covered with black fungus.
  • Treasure: 2d4 Black Fungi (Item, Consumable); very tasty if eaten; worth 3 Gold each.

L2R28
  • Encounter: Just off the trail, there is a small cavern opening. Heading inside reveals a Gargoyle Lair. 
  • 2 Gargoyles; Hostile (will Attack to defend Lair); Currently patrolling the Lair.
    • Gargoyle - 4 CR
      • HP: 20
      • AC: 14
      • AB: +4
      • Damage: 1d6 + 4
      • Special: Stoneskin (This creature takes 2 less Damage each time it takes Damage. It always takes at least 1 Damage.)
      • Save: 13
      • Skills: +2
  • Treasure: 120 Gold pieces, 50 Silver pieces, 100 Copper pieces, 3d4 assorted Gems (each worth 25 Gold), 1 Crystal Foci (see the Magic Item List)


Level 3, Rooms 1 through 5 (Floor 1)

  • Dungeon Level 3 Outline - Darkwater Crag
    • Entrances / Exits: Darkwater Crag Entrance [DWC] (less travelled, somewhat guarded, enters/exits directly into Craghopper Mine)
    • Location: Within Arguk-Val, adjacent to and below Craghopper Mine.
    • Threats: Centipedes (Giant), Centipedes (Giant, Dire), Flail Snails, Gelatinous Cubes, Goblins, Hobgoblins, Rats (Giant)

Level 3, Room 1 (L3R1, Darkwater Crag, Floor 1)
Below is the first "room" of the third Level of the Megadungeon, Darkwater Crag. Like L1R1 (Craghopper Mine), it is not a traditional "room," as it is simply an overall map of the floor. Unlike Craghopper Mine, however, Darkwater Crag is a more natural series of caves with few purposefully dug tunnels. For simplicity, the map is drawn with sharp edges, but the rooms are realistically more misshapen.

Additionally, you will notice that this Floor contains stairs down to the second Floor, as well as underwater passages between rooms. Players will not be immediately aware of these passages but should be rewarded for discovering them.

Unlike previous Dungeon Levels, Darkwater Crag is the first Level in which the GM is expected to run the area using Dungeoncrawling Rules, checking for encounters every 10 minutes. Darkwater Crag, as the name would suggest, is also almost pitch black. Torches or Light Spells will be needed to explore the area safely.
  • Side Note: Between L3R1 and L3R2, the two Floors which make up this Level of the Dungeon only have 25 rooms. The remaining 6 rooms of the month will instead be special encounters that I will be adding to Darkwater Crag's Encounter List, which is detailed below.

Level 3, Room 2 (L3R2, Darkwater Crag, Floor 2)
Like the "room" above, L3R2 is a Floorplan of Darkwater Crag. All of the same things as L3R1 apply.

Additionally, you will notice that this Floor contains stairs up to the first Floor, as well as underwater passages between rooms. Players will not be immediately aware of these passages but should be rewarded for discovering them.


Darkwater Crag Encounter List
When a 1 is rolled on the Encounter Die, the GM rolls 1d20 on the table below. When it comes to the special encounters (15-20), the GM should reroll on the table if that encounter has already occurred.
  1. 1 Legendary Gelatinous Cube; these creatures are not intelligent, solely seeking objects to digest.
  2. 2 Flail Snails; when encountered, these creatures are usually hungry and hostile.
  3. 2 Centipedes (Giant, Dire); when encountered, these creatures are usually hungry and hostile.
  4. "
  5. 1d4+1 Centipedes (Giant); when encountered, these creatures are usually hungry, but cautious.
  6. "
  7. 2d4 Rats (Giant); when encountered, these creatures are usually hungry, but cautious.
  8. "
  9. 2d4 Goblins; these goblins differ from the standard green type, having pale skin and milky-white eyes. They have many jagged teeth, baring them when threatened. They use simple weaponry and are hostile to other humanoid creatures.
  10. "
  11. "
  12. "
  13. Goblin Brigade (2d4 Goblins and 1d2 Hobgoblins); these goblins/hobgoblins differ from the standard type, having pale skin and milky-white eyes. They have many jagged teeth, baring them when threatened. They use simple weaponry and are hostile to other humanoid creatures.
  14. "
  15. L3R26
  16. L3R27
  17. L3R28
  18. L3R29
  19. L3R30
  20. L3R31
Monsters Stats
  • Centipede (Giant) - 2 CR
    • HP: 10
    • AC: 12
    • AB: +2
    • Damage: 1d6 + 2
    • Special: Can climb walls and upside down; Sickening (Causes the Affliction Enfeebled 1 on a hit)
    • Save: 14
    • Skills: +1
  • Centipede (Giant, Dire) - 5 CR
    • HP: 25
    • AC: 15
    • AB: +5
    • Damage: 1d6 + 5, attacks two times
    • Special: Can climb walls and upside down; Carapace (Takes 1 less Damage each time it takes Damage. It will always take at least 1 Damage.); Sickening (Causes the Affliction Enfeebled 2 on a hit)
    • Save: 13
    • Skills: +2
  • Flail Snail - 5 CR
    • HP: 25
    • AC: 17
    • AB: +5
    • Damage: 1d6 + 5, attacks two times
    • Special: Can climb walls and upside down; Blindsense (This creature can automatically sense targets within 30 feet of itself without needing to see them, and it is Immune to the Blind Affliction.); Brutal (Lands a Critical Hit on a Natural 19 or a Natural 20 and deals an additional 5 Damage on Critical Hits); Shell (This Monster has 2 additional AC. This is already accounted for in its Stats.)
    • Save: 13
    • Skills: +2
  • Gelatinous Cube (Legendary) - 6 CR
    • HP: 30
    • AC: 16
    • AB: +6
    • Damage: 1d6 + 6, attacks two times
    • Special: Immune to falling Prone, being Grappled, and being Shoved; Sticky (Once per combat, can automatically Grapple a target on a hit); Engulf (When this creature rolls maximum on Damage, the target is engulfed by this creature. While engulfed, a target cannot Move and attempts Attacks at Disadvantage. They also take 6 Acid Damage at the end of each Round. Finally, a target is only freed from being engulfed if this creature dies.); Legendary (This creature has 1 additional Turn each Round for every 2 party members. For example, it would have 2 additional Turns, or 3 total Turns, if fighting a party of 4.)
    • Save: 12
    • Skills: +3
  • Goblin - 1 CR
    • HP: 5
    • AC: 11
    • AB: +1
    • Damage: 1d6 + 1
    • Special: Can use Ranged Attacks; Scuttle (Can dodge a non-Critical Hit once per combat)
    • Save: 15
    • Skills: +0
  • Hobgoblin - 3 CR
    • HP: 15
    • AC: 13
    • AB: +3
    • Damage: 1d6 + 3
    • Special: Can use Ranged Attacks; Scuttle (Can dodge a non-Critical Hit once per combat)
    • Save: 14
    • Skills: +1
  • Rat (Giant) - 2 CR
    • HP: 10
    • AC: 12
    • AB: +2
    • Damage: 1d6 + 2
    • Special: Scuttle (Can dodge a non-Critical Hit once per combat)
    • Save: 14
    • Skills: +1

Level 3, Room 3 (L3R3)
This room contains multiple rocks covered in a slick, black moss. A pool of cold, dark water lies in the southern half of the room. To the east, there is a thin, recently dug tunnel.
  • Special: When this room is first entered, it always triggers an Encounter. The GM rolls on the Darkwater Crag Encounter List with a -5 penalty on the roll (minimum roll of 1).
  • Treasure: Encounter dependent.

Level 3, Room 4 (L3R4)
This room contains multiple rocks covered in a slick, black moss.
  • Special: When this room is first entered, it always triggers an Encounter. The GM rolls on the Darkwater Crag Encounter List with a -5 penalty on the roll (minimum roll of 1). Also, see room L3R5.
  • Treasure: Encounter dependent.

Level 3, Room 5 (L3R5)
This room contains multiple rocks covered in a slick, black moss. A pool of cold, dark water lies in the northeastern corner of the room. There is also a thin, recently dug tunnel connecting part of the room to the northern exit.
  • Encounter: Goblin Camp [1d4+1 Goblins]; Hostile (will attack); Currently cooking a Giant Rat over a small fire.
  • Special: If L3R4 contains a combat encounter, the Goblins here will be alerted and will move to L3R4 as "reinforcements" at the end of the 3rd Round.
  • Treasure: Goblin's treasure (if any), 1d4 Rations worth of cooked Giant Rat meat.

[#DUNGEON23] Mountain of the Frost Baron - Settlement Outline - Argukhart

Argukhart!

ARGUKHART. IS. DONE. It really wasn't all that difficult to finish, but I had really been struggling to find the time to work on a whole settlement. One room each day is fairly easy, but a whole settlement just feels intimidating sometimes. Anyway, below is Argukhart!
  • Settlement Outline - Argukhart
    • Location: Within/below Arguk-Val, connected directly to Craghopper Mine
    • Environment: Built partially within natural caves and partially carved out
    • Type: Large Village
    • Population: approx. 3000
    • Culture: Primarily Dwarf, some Human influence
    • Defenses: Within a mountain, 70 Town Guards, 4 Guard Captains, 1 Guard General
      • Town Guard (Argukhart) - 3 CR
        • HP: 15
        • AC: 13
        • AB: +3
        • Damage: 1d6 + 3
        • Special: Can use Ranged Attacks; Fortitude (Advantage on Saves)
        • Save: 14
        • Skills: +1
      • Guard Captain (Argukhart) - 5 CR
        • HP: 25
        • AC: 15
        • AB: +5
        • Damage: 1d6 + 5, attacks two times
        • Special: Can use Ranged Attacks; Fortitude (Advantage on Saves); May command an ally once per Round, allowing them to attack once.
        • Save: 13
        • Skills: +2
      • Guard General (Argukhart) - 7 CR
        • HP: 35
        • AC: 17
        • AB: +7
        • Damage: 1d6 + 7, attacks two times
        • Special: Can use Ranged Attacks; Fortitude (Advantage on Saves); May command an ally twice per Round, allowing them to attack once.
        • Save: 12
        • Skills: +3
    • Diet: Beets, Carrots, Fungi, Potatoes, Mead, Meats, Milk
    • Exports: Crops (fungi), Livestock (chickens, donkeys, pigs), Resources (stone and minerals), Specialty Goods (gems)
    • Imports: Crops (beets, carrots, potatoes, mead, meats, milk), Resources (wood)
    • Government: The Council of Elders (Each head of their respective Clan)
    • Water Source: Underground aquifers, wells

Settlement Details - Argukhart
Argukhart is the second most populous settlement in the region, with approximately 3000 inhabitants. These people are most often Dwarves. Humans and Halflings are less common. The people of Argukhart cannot grow traditional crops, but they do have many fungi farmers who cultivate underground strains of mushrooms. These fungi make for a popular but bland side dish in many Dwarven meals. However, the brewers of Lostone are able to ferment quality mead using Argukhart's fungi. Additionally, Argukhart is the primary producer of stone and precious minerals. All of this makes Argukhart an important village, but certainly not the most powerful. Finally, Argukhart is led by The Council of Elders. Each elder is a Dwarf a few-hundred years old who is currently the eldest of their Clan, or family. Dwarven Clans tend to be very large and far-reaching, being hundreds of members in number.


Important Locations within Argukhart
Below is a list of specific locations with importance in Argukhart. Not every building or shop is listed. The GM may add to Argukhart in any way they see fit, adding anything to the village that they wish. You will notice each settlement usually only has named 1 shop or merchant of each type. If you wish to add more, practice your improvisation! Make up some names.
  • The Portcullis: The Portcullis is the only commonly used way in or out of Argukhart. While there are hundreds of hidden escape shafts throughout the village, the only safe and relevant way in or out is The Portcullis, which serves as the front door. The Portcullis is located on the southern edge of Argukhart, connecting directly to Craghopper Mine.
    • Portcullis Barracks: Located alongside The Portcullis. Most Guards are stationed here, with others patrolling the village.
  • Miner's District: The Miner's District is found directly beyond The Portcullis. It serves both as the economic heart of the village but also as the lower-class housing district. Most miners live here with their families.
  • Fungal District: The Fungal District takes up the eastern edge of the village. Houses in this district are cheap, as they are often built into natural caves where fungi are cultivated. A small guard barracks is also located here to deal with the occasional cave monster.
  • Market District: The Market District takes up the majority of the western half of the village. General goods may be purchased here, but not fine goods. Prices here tend to be below average.
    • The Clumsy Miner: Found on the southern side of the Market District, this Inn is a popular locale for the working class of Argukhart. Food, drinks, and a night's stay are somewhat cheap, in both price and quality.
    • Krobac's General Goods: Found in the heart of the Market District, this shop sells general goods. Almost any kind of Standard Item may be purchased here, save for Armor, Weapons, and Potions.
    • The Miner's Guild: Found on the edge of the Miner's District and the Market District. Jobs within Craghopper Mine can be found here. Precious minerals can also be traded here at a fair price.
      • Job Board: When looking for jobs, players may find up to 3 jobs each day based on the table below. When using the job generator, the GM rolls 1d4, 1d6, and 1d8.

    • The Silvered Anvil: Found near The Miner's Guild, shop offers quality metalwork. Many types of Armor and Weaponry may be purchased here. They will even Silver Weapons and Armor, for a steep price.
  • Mercantile District: The Mercantile District is found in the northern half of the Market District. Fine goods may be purchased here. Prices here tend to be high.
    • Fungal Curiosities: Found in the heart of the Mercantile District, this shop sells both Alchemical and Magical wares, such as ingredients, Potions, Poisons, Firebombs, Magic Items, etc. The prices here are high.
  • Residential District: This district makes up the center of the village. The majority of citizens live here, but they are often better off compared to those who live in the Miner's District.
    • Arguk-Stol: This religious site serves as a temple dedicated to Arguk, the Dwarven God of the Hearth and Home. Clerics of Arguk claim that this site is where Arguk struck the tundra with his hammer, forging all of Argukkiin. The site is packed with worshipers most times of the day, with services being held at 6 AM, noon, and 6 PM daily.
  • Noble District: The Noble District makes up the northern sector of the village. The wealthiest Dwarves live here, most being the head of their Clan. There are some specialty shops, such as jewelers and magic item merchants. Prices here tend to be high.
    • Jemm-Stol: Found between the Noble District and the Mercantile District, this shop buys and sells high-quality jewels and jewelry. They often pay well when buying fine jewelry from sellers.
    • The Council Chambers: Found in the heart of the Noble District. This impressive building serves as the meeting place for the Clan elders, where they decide the future of Argukhart each day. The halls of the Chambers are often patrolled by a minimum of 20 guards.
      • GM Note: While only 3 Elders are named, the council consists of 15 elders. Many of them are nobles with little meaningful impact on Argukhart beyond their wealth.

Important People in Argukhart
Below is a list of specific people with importance in Argukhart. Not every inhabitant is listed. The GM may add to Argukhart in any way they see fit, fleshing out the 2500+ unnamed NPCs if they so choose.
  • Dorich Alemaster: Owner and bartender of The Clumsy Miner. He is an older Dwarf with short graying hair and a stocky build. He walks with a slight limp and has a lazy left eye. He is 201 years old and was once a miner in Craghopper Mine. He claims that a cave-in caused both his lazy eye and his limp. He is generally kind but has a temper.
  • Krobac Thunderaxe: Owner of Krobac's General Goods and a member of the large and wealthy Thunderaxe Clan. He is fairly young and is a low-ranking member of the clan, only 73 years old and relatively poor compared to his family. He has a thick brown beard, but no hairs grow on the top of his head. If shown the Lost Brooch from L1R29, he will eagerly offer to pay for its safe return. He is a distant cousin within the Clan.
  • Orina Thunderaxe: Guildmaster of The Miner's Guild. She is an older Dwarf with long platinum hair and a thin build. She is 187 years old and has spent most of her life as the Guildmaster. She married into the wealthy Thunderaxe Clan. If shown the Lost Brooch from L1R29, she will eagerly offer to pay for its safe return. She is married to Bordick Thunderaxe.
  • Riina Coalblower: Owner and blacksmith of The Silvered Anvil. She is a younger Dwarf with short red hair and a stocky build. She is only 61 years old, but a budding master of her craft. She is the great-granddaughter of Aldiin Coalblower, elder of the Coalblower Clan and member of The Council of Elders.
  • Aldiin Coalblower: Elder of the Coalblower Clan and member of The Council of Elders. He was also once the blacksmith at The Silvered Anvil before he passed that duty onto his granddaughter, Riina. He is an old Dwarf, currently 239 years old. He is quite tired most of the time, and his age is always visible on his bald and clean-shaven face.
  • Kurda Thunderaxe: Owner of Fungal Curiosities and member of the Thunderaxe Clan. They are a middle-aged Dwarf with dark brown hair. They are 154 years old and have never married or had children. Some Dwarves treat Kurda with little respect due to Kurda's refusal to adhere to Dwarven gender norms. If shown the Lost Brooch from L1R29, Kurda will eagerly offer to pay for its safe return. They are a distant cousin within the Clan.
  • Azar Wisemind: Devoted priest of Arguk, serving at Arguk-Stol. He is a middle-aged Dwarf with jet black hair and a curly beard. At 133 years old, he has made a name for himself as the leading priest of Arguk in the area. Despite his last name, Azar is a member of the Alemaster Clan. When he became a priest, many took to calling him a new name, Azar Wisemind. The name stuck, but he remains a member of the Alemaster Clan in full. He is married to Geedu Wisemind.
  • Geedu Wisemind: Devoted priestess of Arguk, serving at Arguk-Stol. She is a middle-aged Dwarf with long blonde hair. She is 120 years old. She has also taken on the last name Wisemind alongside her husband, Azar. Azar would never admit it, but Geedu is disappointed in their marriage and actively seeks to leave him in secret. Recently, she has been seen spending more time with Edward Sedgewick.
  • Edward Sedgewick: Devoted priest of Arguk, serving at Arguk-Stol. He is a young Human with red hair and a short beard. He is new to the area and only 25 years old. He works diligently to fit in to Dwarven society and seeks to prove himself as a priest of Arguk. Despite Geedu's advances, Edward is oblivious to her interest and unaware of her marriage troubles.
  • Borra Ringseeker: Owner of Jemm-Stol. She is a middle-aged Dwarf with long black hair and an average build. She is 111 years old and only recently moved to Argukhart 6 years ago. She offers great prices when buying gems and jewelry.
  • Undin Alemaster: Elder of the Alemaster Clan and member of The Council of Elders. He is the father of Dorich Alemaster, but is not very proud of him. Undin is a 225-year-old Dwarf but looks a bit younger than that with his still graying hair and fit build.
  • Bordick Thunderaxe: Elder of the Thunderaxe Clan and member of The Council of Elders. He is an old Dwarf, 231 years old. He has white hair and a thin but long beard. He is known for being cruel and loveless. If shown the Lost Brooch from L1R29, he will demand it be returned and imply the party are thieves, not offering any compensation. He is married to Orina Thunderaxe.

Dungeon! - Full System Reference Document 2024

Don't mind me, I'm just casually posting a full SRD  for Dungeon! It is completely free of course, but all of the art has been purch...